

As explained earlier, the idea behind Sudoku puzzles is to fill the grid with numbers, one number per square, with just three restrictions:
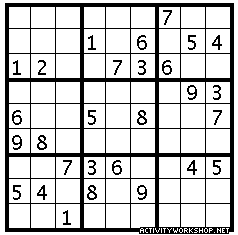
The combination of these three rules, where each number must appear once and only once per row, column and box, allow you to figure out where the numbers are allowed to go. An example is shown on the right.
There are several techniques you can use to solve the puzzles and figure out where the numbers have to go. There is a very wide range in difficulty of the puzzles, so some will only require straightforward techniques and the more tricky ones will need much more thought.
Here we'll look at several techniques, starting with the easiest ones.

Perhaps the simplest of rules, if there is only one empty square in any column, row or box, then you can immediately tell which one is missing, and can fill it in with absolute certainty! For example, in the picture on the right you should be able to tell which number should be entered in the empty square:
Note also that this rule can be applied to rows and columns as well in exactly the same way. If you're using the helper applet here at the Activity Workshop then you should see a green marker on the box (or by the edge of the row or column) when you complete it. A red marker would mean that you've made a mistake and entered the same number more than once.

Also known as cross-hatching, this method involves looking at all the appearances of a given number, and drawing imaginary lines horizontally and vertically from these numbers. Each number can only appear in each row or column once, so these lines eliminate possibilities for where the number can appear in other boxes.
In the example shown on the right, the positions of four 4s are already known, and we're trying to find where the 4 should go in the upper-right box. Only 5 of the 9 boxes are shown here to make it a bit simpler.
Because there can't be more than one 4 in any row, we can draw (in our heads) a horizontal line from the first 4 meaning that wherever the 4 is in the top-right box, it definitely can't be in the top row. Similarly from the second 4, we can tell that it can't be in the middle row either - therefore it must be somewhere on the bottom row.
We also know that there can't be more than one 4 in any column either, so we can draw (again in our heads) vertical lines from the known 4s and confidently state that there can't be any more 4s there either. Because the top-right box definitely needs a 4 somewhere, and because we've now eliminated the top row, the middle row, the left column and the middle column, we can confidently place the 4 in the only remaining possibility, the bottom-right square.

Often it's useful to mark the possibilities for where a number can go, and if you're solving a puzzle on paper it's easy to mark little notes in the corners of the squares. The Sudoku applet here lets you do the same with a right-click on the square - the numbers you enter are marked smaller and grey to signify that they're just possibilities at the moment.
How you use markers is up to you, but it's recommended to be very clear and consistent with what you mean. For example, in the example shown here with both 3 and 9 marked, it could mean either of two things:
It's a good idea to decide what you want these markers to mean, and stick to it. How you interpret the effects of other numbers depends on how you use the markers. For example, suppose you find a 9 elsewhere in the same box. Does this mean that this undecided square is now definitely a 3? Maybe not, if the 3 could also go somewhere else. It definitely means it isn't a 9, but maybe there are other possibilites you haven't marked yet.
It's also a good idea not to overuse these markers, so as not to flood the grid with numbers and make the overall picture less clear. Use them sparingly after you've narrowed the possibilities down.

Sometimes it's possible to use the elimination technique above even if you don't know exactly where one of the numbers lies. For example if all the possibilities within a box share a row, you can use that row to eliminate squares in other boxes. In the picture shown here, the position of the 2 in the left-hand box isn't yet known, but both possibilities lie on the bottom row. That means that in the right-hand box, there can't be a 2 in the bottom row. Because of the 2 in the middle box, the top row is also eliminated, which only leaves one remaining square in the right-hand box for the other 2 to go.
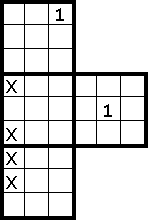
You can use the following rule when a row or a column needs a particular number, but there are only a limited number of free squares in which it can go. The available squares can be reduced by other occurrences of that number in the same box, row or column.
In the example picture here, we're looking at the first column of squares, and looking to see where the 1 in that column could go. The numbers other than 1 have just been called 'X' here to make things easier to see. There are five empty squares in this column, and one of them must have the number 1. However we know that the 1 can't be in any of the top three squares, because the top box already has its 1. Similarly the empty square in the second box can't have a 1 either, because there's already a 1 in that row. That means there's only one square in that first column that can have a 1 in it, and we can put the 1 in that bottom square.
There's an alternative way of looking at these 1s, which is equally valid. You can use cross-hatching as before with the two 1s to eliminate five of the squares in the middle-left box. That means that the 1 in this box can only be in the middle column. Using that and the 1 from the top box means that in the lower box the 1 must be in the left-hand column, in this case the bottom-left square. Thinking this way is exactly equivalent but just looking at it from a different angle.
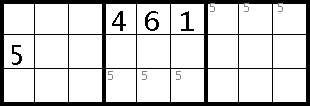
If a box has a line of three squares already filled in, it obviously prevents any other numbers from going there. If neighbouring boxes have numbers in the other two columns, you can use the cross-hatching technique to narrow down the possibilities.
This is essentially no different from the cross-hatching described above, but the line of three helps greatly by restricting the possiblities to a single row or column. If you see one of these rows of three, it's therefore worth looking again at the neighbouring boxes to see if there are any such hatchings available.
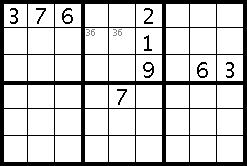
Sometimes numbers can form pairs, whereby two numbers must appear in two given squares and only the order isn't yet known. For example, in this picture it's known that the 3 and the 6 are in the middle row of the top-middle box, but we can't tell yet whether it's 3,6 or 6,3. We can still use these markers to tell us information about the 7s though.
From the markers we know that it's definitely either 3,6 or 6,3 - whichever it is, those two squares are occupied and there's no room there for the 7. So even though our cross-hatching with the 7s leaves us with two possible squares, one of them is already taken (by either a 3 or a 6), and so the 7 must go in the other one, the bottom-left square of the top-middle box.
Care must be taken with this rule, depending on your chosen meanings of the markers. If there were three possible squares for
the 3 and the 6, and all three squares were marked with "36", that wouldn't mean that the 7 couldn't go in any of them.
A similar pattern can be used for triples, whereby three numbers appear in three cells, for example "34", "36" and "46" -
in this case all three squares would be occupied.

At first glance, it may seem that there isn't enough information in this grid to find any more of the 8s. Only two of them are
known, and they don't provide any good cross-hatching opportunities in the top-left box. If you look closely, however, you'll
find a full triplet in the middle-right box, which allows you to narrow the 8 down to the two right-hand squares. Although you
still don't know which one the 8 is in, knowing that it's in the right-hand column lets you use elimination in the bottom-right
box, and determine that the 8 in the lower box must be in the left column. This becomes part of a chain, where you can use
this new 8 to find even more.
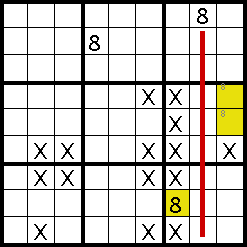
Using this second 8, we can use cross-hatching in the bottom-middle box, and find just two remaining possibilities for the
8 there - both in the middle column. Using this together with the 8 in the top-middle box, tells us that the 8 in the
middle-middle box must be in the right-hand column, and as there's only one empty square there, we can put the 8 in
there.
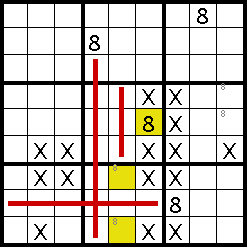
We can now follow the chain back round to the middle-right box, and eliminate one of our two possible 8s, leaving just one possible square in the top-right of this box. This shows the importance of the markers - they started off this chain and then lead to their own solution.
Using the 8s in the middle-middle and middle-right boxes then allows us to look at the middle-left box, and find another of the missing 8s.
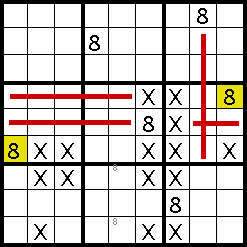
From here on, it's just straight cross-hatching, firstly looking at the bottom-left box and eliminating all possibilities
except the lower-right square. Using this eliminates one of our two markers in the bottom-middle box, allowing us to place
the 8 in the upper square, and finally the 8s in the middle-left box, bottom-left box, top-middle box and top-right box
all conspire to pin down the final 8 in the lower middle square of the top-left box. Phew!
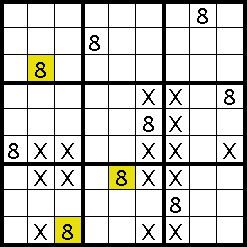
At the start it didn't seem like much could be ascertained from the scarcity of 8s, but by following the chain, leading from
one clue to the next, and using markers, we managed to find out where all the other 8s were.
Now that you've seen these rules and seen some simple examples, try to put them in action with the puzzles here on this site. There are ten of them in total, starting with one of the easier ones, puzzle 1.