
Hike time: | 3 hours each way |
Approx dist: | 5 km there, 6km back |
Start: | Pico Arieiro |
Finish: | Pico Arieiro |
Profile: | from 1820m down to 1570 and up to 1870m, and similar for return |
Rating: | Hard work with lots of steps! Easterly route is tougher than westerly. |
This hike isn't one for the faint-hearted, or for those without a head for heights. It offers some of the most spectacular mountain scenery on the island though, and unparalleled panoramas from the precipitous (but safe) footpaths. Bring your wide angle lens and your picnic.
This also isn't a hike to do on your first days in Madeira, take some time to build up your fitness because the sheer number of steps on this hike take some effort.
There are several tunnels on this hike, but none of them are very long or very dark. A flashlight (pocket torch) can be useful for these but isn't really necessary.
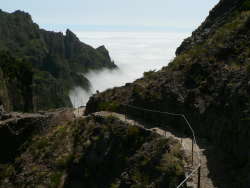 Path heading down steps from Arieiro 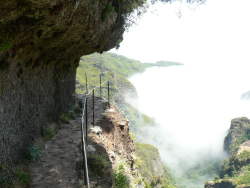 Path following the ledge carved from the cliff  The green summit of Pico Ruivo 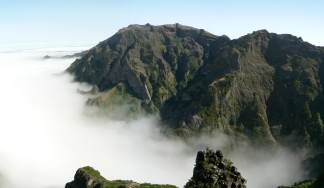 Looking across at Pico Arieiro on the way back |
The walk starts and ends at Pico do Arieiro, where there is ample free car parking and even a restaurant and souvenir shop.
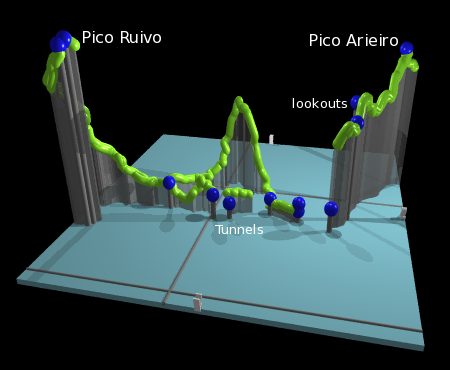
This kmz file (4 kb) contains waypoints from this Pico Ruivo hike and shows the path as a red line over and around the mountains. Simply open it in Google Earth (File -> Open) and you'll see the route in full. Press the "Play Tour" button below the listed waypoints and you can fly a tour along the hike in 3d.
Pico Arieiro - Pico Ruivo - Pico Arieiro
 |
There are crowds at the top of Pico Arieiro, by the busload. And it's easy to see why, the access is easy by car or by coach tour and the scenery is stunning. The rugged rocks look like from another world but the sea is also visible on a clear day. You can't see Pico Ruivo from here though, as it's hidden by the craggy Pico Torres.
Once we tear ourselves away from the crowds and the pan-pipe music, the way ahead is clear. There's only one footpath here so you can't go wrong - it's the one with all the steps leading downwards. With open views to left and right, and Pico Torres directly ahead, the path plunges bravely downward, with just scraps of trail visible ahead. After around 15 minutes you reach a turnoff where the right-hand path leads a short distance to a lookout point. From here you get great views out over the valley to the right, often blanketed in cloud.
Back at the fork and continuing on the main path, you reach a second lookout point with a picnic table carved out of the rock after around 10 minutes walk. Soon Pico Ruivo also appears from behind Pico Torres. After this, the path begins to descend more sharply, dropping to enter the first tunnel under the summit of Pico do Gato.
Shortly after emerging from the tunnel, the path splits and offers two options - the left-hand path (the westerly of the two) is flatter but negotiates more tunnels. The right-hand path to the east has no more tunnels but requires a lot more climbing and descent. Both paths have the same destination though, they meet up and lead to Pico Ruivo, so it doesn't matter which one you take. Sometimes, however, one of the two paths may be closed for safety reasons. When we were there, both routes were open but on the way back a "prohibido" sign blocked the westerly path, even though no such sign existed on the outbound route.
Taking the left-hand route then, it's a relatively flat route passing through a series of major tunnels and several smaller ones. None of these tunnels have levadas in them though, they're just for hikers! After the last tunnel exit the paths merge again and continue towards the now-visible Pico Ruivo.
Climbing in switchbacks, the path soon reaches the Pico Ruivo hut, where you can buy canned drinks but no food. There is also a water tap outside the hut, useful for refilling your bottles in the heat. The path then cimbs the last 90m or so towards the summit, ignoring the turnoff to Encumeada and heading straight for the wooden summit platforms and the panoramic views. There are three of these wooden lookout platforms, with the middle one being the highest of the three.
Depending on whether both routes of this hike are currently open or not, it may be that the return to Pico Arieiro is exactly the same as the outbound hike. However if both are open, we can explore the other route on the way back.
We return along the platforms and down the switchbacks to the hut, and back to where the paths joined. Here, instead of going through the tunnel, we follow the path to the left to take this time the easterly route. This path starts off fairly level, heading southeast, but soon starts to climb around the shoulder of Pico do Gato.
The path climbs steeply to 1720m and then just as steeply drops down again, curving round to the right and providing great panoramas of the side of Arieiro and the unusual rock formations along the way. After reaching a low point of 1540m, the path then climbs back up to the junction of the paths and passes back through the first tunnel, before the long long climb back up the steps to Pico Arieiro where the hike started.
The following are the coordinates for waypoints along this route, obtained from GPS. They can be used either in another
GPS, or along with a map, to provide additional references if necessary.
                           Latitude       Longitude    Altitude(m)
       Pico do Arieiro    N 32°44'08.5    W016°55'43.3    1822
       Lookout1           N 32°44'21.3    W016°56'00.6    1745
       Lookout2           N 32°44'21.0    W016°56'12.8    1731
       Tunnel1            N 32°44'25.6    W016°56'21.4    1680
       Fork               N 32°44'34.8    W016°56'18.0    1572
       Tunnel2            N 32°44'43.2    W016°56'15.4    1582
       Tunnel3            N 32°44'54.4    W016°56'20.7    1580
       Tunnel4            N 32°45'13.1    W016°56'18.6    1602
       Hut                N 32°45'37.3    W016°56'29.5    1769
       Pico Ruivo         N 32°45'31.7    W016°56'33.4    1867
There are some more details (in German) and lots of photos of this hike at marcatweb.de.
There is also an alternative, much shorter and much easier route to the top of Pico Arieiro, reached by driving up from the Sao Vicente side. From here it's just around half an hour up to the summit and half an hour back down again.
Another alternative requires spending the night at the Pico Ruivo hut and on the following day continuing westwards over the Boca das Torrinhas to finish at Boca do Encumeada. This adds about another 4-5 hours and a long descent down to around 1000m.