
Following the success of the accelerometer project, and the games which resulted from it, more ideas came about other kinds of sensor which could be connected to the pi. But we're not really interested in 'passive' sensors like temperature sensors, light sensors or soil moisture sensors. We're looking for ways to interact with the pi, especially for game-playing, and when possible in unexpected ways, like for example the stick from the forest controlling a video game.
One of the original ideas was to have one or more ultrasound distance sensors, perhaps hidden or disguised in some way, so that just by holding one's hand in the air in particular positions makes the pi do something, perhaps making a kind of theremin or whack-a-mole game.
However, these ultrasound sensors work by necessity in a pulsed mode, so the control cannot be continuous. Plus the volume which can be covered by these little transmitters is very restricted, and the measurement is only one-dimensional. So this idea was dropped for a while, until I found out about the Pimoroni skywriter "3D Gesture Sensor".

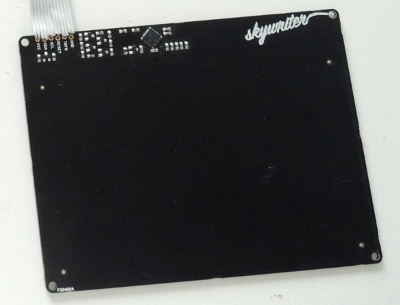
So what is it? It's just a flat, black rectangle which, through some kind of electric field, can tell what's in the space above it. If you hold your finger above the rectangle, this sensor outputs the (x, y, z) coordinates of where your finger is in that space, and also reacts to gestures like swipes and taps. One attractive feature is that the sensor is really thin and so could be easily hidden, especially if you cover it with a sheet of something non-conductive. So you've then got a "magic space" in 3D which does stuff even without you touching anything.
It comes in two different sizes, firstly the "HAT" version which fits directly on top of the pi (but only if the pi is a version B+ or 2), and secondly an "XL" version which as the name suggests is larger. I've got a Raspberry pi version 1B, so mine doesn't support the "HAT" interface anyway, and so I got the XL so that I've got a bigger volume in which to play.
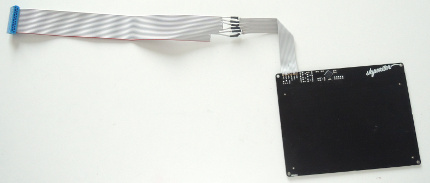
As with the accelerometer, the pi communicates with this sensor using I2C, so that means as well as power, it uses the SDA and SCL pins of the Pi. Plus it uses another two GPIO pins for "TRFR" and "RESET". So that's 6 connections in all. For the "HAT" version of the skywriter, these connections are done for you just by putting the board on top of the pi, but for the XL version there's a little bit of soldering to be done.
The board just has 6 holes for the connections, to which you can choose to solder the included 6-pin header rail. But then you'd have headers sticking out vertically from the board, and then plugs attached to the top of those, and then wires coming out the top of those, which for me would intrude too much into the invisible magic space I'm trying to create. So I decided to take some flat ribbon cable and solder this directly onto the holes, meaning that everything stays flat and there is nothing to accidentally snag with your finger gestures.

The next question is, which side is up? That is, on which side of the board does the detection happen? The board doesn't give any clues, and there aren't any instructions included either. But some experimentation showed that the sensor side is the mostly black side with the chip on it, not the side with the large "Skywriter" logo and the "Tech specs". Which is a little odd, because most of the pictures one sees of the "HAT" version show that the sensor side for that one has a large "Skywriter" logo and no chip.
In any case, we need to connect the pins, and most of them are obvious. The pi's 3V3 goes to the sensor's VCC. The pi's 0V goes to the sensor's GND. SDA goes to SDA, and SCL goes to SCL. The only difficulty is with TRFR and RESET. But thanks to the ever-excellent MagPi, we find out that TRFR goes to pin 13, and RESET goes to pin 11. And that's the same also for the model 1B.
Because we're again using I2C for the communication with the pi, this sensor also needs the pi to be set up to enable I2C. But because we've already done this for the accelerometer, it's already done. If you haven't already done this, then you'd need to follow the instructions on the accelerometer page to set things up properly.
Now we just need some software on the pi to operate the sensor, and fortunately there is a bunch of python programs provided by Pimoroni at github.com/pimoroni/skywriter-hat.
For example, just run python3 test.py to see the (x, y, z) coordinates printed on the screen. It looks like it's doing nothing (or taking ages to start) but actually it's just waiting for your finger. Put your finger over the sensor, and it'll scroll the coordinates (all x,y,z scaled from 0.0 to 1.0) up the terminal. Swipe quickly over the whole sensor and it'll register a "swipe" gesture with the direction (eg east -> west). Draw horizontal circles in the air over the sensor and it'll register an "airwheel" gesture with a value which is increased or decreased depending on the direction of the circle.
So now it's tested and working, and it's time to try out our own ideas.